All in all, I have thoroughly enjoyed the course. Back in July when I first purchased my Nikon D90, I got it home and thought what on earth have I done. What does this do and what does that do. I've got quite a few tips from the D90 manual which I purchased at the same time as the camera. But, I've not learnt as much from the book as I have done on the course as it is more hands on.
I think that my favourite part of the course would have to be the light writing exercise, even more so after I purchased a torch that produced different colours.
I normally use a 18-105mm lens for my images. I also own a 55-200mm lens but for some reason, I normally find that I get better images from the 1st lens. Probably something that I'm going to have to figure out over the coming weeks. At Christmas, I was lucky enough to receive a Tamron 90 mm Macro lens and I love it. Not only have I found it to be brilliant at taking close-up images of flowers and insects etc, it's also good for taking portrait shots too.
Wednesday, 26 January 2011
Final Images
After choosing my 6 thematic images, I have now chosen my 6 final images. All have been taken with my Nikon D90, Tamron 90mm Macro lens, a tripod, a full battery and sufficient space on a memory card.
Image 1

Image 2


Image 1

F5, ISO 200, Exposure 1/100 Sec
Image 2

F5, ISO 200, Exposure 1/20 Sec
Image 3

F5, ISO 200, Exposure 1/500 Sec
Image 4

F5, ISO 200, Exposure 1/5 Sec
Image 5

F5, ISO 200, Exposure 1/100 Sec
Image 6

F5, ISO 200, Exposure 1/100 Sec
Health & Safety
The fact that I have chosen to do close-up flowers as my theme, you wouldn't think that there would be any health & safety issues to consider. Being a freelance florist, I know some of the dangers to consider with handling flowers. One of the main things to consider is that flowers look harmless-most of them are, a few are poisonous, a small handful are deadly. Pollen can be fatal to animals. So, care needs to be taken to clear the area well after photographing flowers, and hands need to be washed.
If using a dark room for processing images, care must be taken when handling chemicals.
If using a dark room for processing images, care must be taken when handling chemicals.
Assignment 108 - Digital image manipulation
Flowers
For this assignment, I have stuck to my chosen flower theme. This way, I find that everything ties in quite nicely. I have also used a few other images of photographs that I have previously taken to use as by main background image.
I used a Nikon D90, a full battery and sufficient memory card room.
I have to manipulate 4 images and display them with the unmodified images.
Software used for all images:- Photoshop Elements 9.
Bath

Taken with Nikon 18-105mm Lens
F5.6, ISO 2000, Exposure 1/30 Sec

Taken with Tamron 90mm Macro Lens & Tripod
F5.6, ISO 200, Exposure 1/3 Sec

Taken with Tamron 90mm Macro Lens & Tripod
F5.6, ISO 200, Exposure 1/20

Finished Image
For the flowers in the bath image I started with the bath image as my background. I clicked Enhance then Lightening-Lighten Shadows and set that at 46%. I also set the Brightness to 32 and the Contrast to 44.
For the flowers, I used the Magnetic Lasso Tool and cut around the flowers to be used. I then clicked on Enhance, Adjust Lighting, Lighten Shadows 34%. The flower was then dragged onto the main picture. I then clicked on Image, then Resize, then Scale to shrink it down. It was then placed in the required place and then further flowers were shrunk in the same way.
I quite like the image but upon seeing the images printed out, I could've lightened the small flowers a little more maybe. Marie told me to lighten the bath a little, which I did, and I like the result.
Sea

Taken with Nikon 18-105mm Lens
F5.6, ISO200, Exposure 1/125 Sec

Taken With Tamron 90mm Macro Lens
F5, ISO 200, Exposure 1/15 Sec

Taken with Tamron 90mm Macro Lens
F5, ISO 200, Exposure 1/2 Sec

Finished Image
For this image, I used the back ground from the sea at West Runton, near Cromer. I changed the settings a little to, Enhance, Brightness 20 and Lighten Shadows 25%. I used the Magnetic Lasso Tool to go around the images of the flowers and then they were dragged onto the image and then shrunk down, as previously explained. With the pink flower, I changed the Brightness to 27 and the white flowers were changed to Brightness 14. The 2 flowers at the end of the pier had their colour removed.
I really like this image as I love photographs of the sea, especially when it starts to get rough. I also like the way how the pink flower fits onto the pole with the seagull on top.
Tree

Taken With Nikon 18-105 mm Lens
F13, ISO 200, Exposure 1/125 Sec

Taken with Tamron 90 mm Macro Lens
F5, ISO 200, Exposure 1/13 Sec

Finished Image
For this image I used a dead tree which I photographed one Winters' morning before Christmas in Bradgate Park, Leicestershire as my background. I didn't alter anything about it as the sun was shining and I thought that the brightness and colours didn't need tweaking. I went around my flower image with the Magnetic Lasso Tool and then altered the Brightness to 53 and the Contrast to 23. The flower was then dragged onto the tree trunk and the size was altered as explained previously.
I really liked the look of the tree when I first took the picture on that frosty morning in December. Marie gave me the idea of adding large flowers into landscape images and I really like the result.
Metal Book

Taken with Nikon 18-105 mm Lens
F4.5, ISO 500, Exposure 1/15 Sec

Taken with Tamron 90 mm Macro Lens
F5, ISO 200, Exposure 1/30

Finished Image
For this image I used the metal book as my background. I cropped the flower image to cut off any background detail that I didn't want showing. I dragged in the metal book image, and then I dragged the flower image in too. I then clicked on Layer Mask. I clicked Eraser and took the Opacity down to 8% for the flowers and 100% to knock out any background around the book. I then clicked Enhance, Adjust Lighting, Shadow/Highlights, Lighten Shadows and set it at 25%.
I struggled like mad with this one, as I've only just brought the copy of Photoshop Elements 9 and seeing as it doesn't come with many instructions, it was like the blind leading the blind. I found that youtube was a very useful tool for getting me through this layering image. I was so pleased once I had finished it. On the whole, I liked the image produced, I also like how the flowers were faded, still leaving the image and the water marks.
I have had to elaborate on how I have achieved these results as I wasn't able to do any screen grab. So I'm hoping that I've given sufficient step by step instructions.
Assignment 107 - Introduction to presenting photo images
I have chosen to present my images in a scrapbook style album as opposed to a disc or a memory stick. I feel that by doing this, at least at the end of the course, I will have produced something to hold and view instead of a disc or memory stick which could easily be lost or mislaid. Also, I find that hopefully, this will be more pleasing on the eye. So, as I write this, I am waiting for my photographs to arrive through the post from Photobox.
There are other ways in which I could have presented my images, two of which I have already spoken about (disc or memory stick). They could be viewed on a slideshow format. I could have presented them in wallets, similar to how wedding photographs are displayed. Another method would have been to place them at random onto a page to create a type of collage and then print them off as a poster. Canvas could also be used, especially if the images are of exceptional high quality, and cost is not an issue.
Other ways in which professional photographers/artists present their work includes exhibitions and galleries where they will present their images, usually framed or on canvas, as large single pictures or smaller if they consist of groups. Also, people have websites and they will present them on there, either just for viewing or ordering. Wedding photographers will present their images as proofs to begin with. These may be in a book (small) that you can flip through and order them from that or, if it was anything like our wedding photographer, he scattered every one of our photographs onto a large table, and there we sat one night wading through them deciding which ones to keep and which ones to ditch. The ditched ones were sold off to family members that wanted them cheaply. The ones that we kept were collated into a proof album. At the end of it all, we were presented with our wedding album with protection paper over every image. A wealth of enlargements are available for your wedding images also.
Lots of photographers now present their work on laptops or ipads as this is so much easier for them to display their portfolio. Everything is accessible and they can sell themselves to you at a click of a button.
Assignment 104 - Introduction to close-up image capture
Flowers
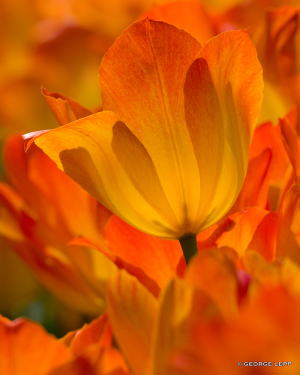
For this assignment, I used my Nikon D90 camera, a Tamron 90mm Macro lens, a tripod, a fully charged battery and a memory card with ample space. With my subject being flowers, I needed the image to look as exact to the flower as possible, so I didn't use the flash, as I found that it was giving inferior colours to the flower in which I was photographing. Instead, I used natural daylight and I photographed them on my large window cill.
For the tulips, I had fun with sunlight. I had my camera set to a multitude of settings before I achieved the desired effect.
I was required to produce a folio of 6 thematic images.

F5, ISO 200, Exposure 1/5 Sec

F5, ISO 200, Exposure 1/100 Sec

F5, ISO 200, Exposure 1/60 Sec

F5, ISO 200, Exposure 1/1600 Sec

F5, ISO 200, Exposure 1/100 Sec

F5, ISO 200, Exposure 1/20 Sec
I have taken hundreds of images of different flowers trying to get the balance correct, each time adjusting the exposure until I was happy with the result. I used Photobox to develop the images but upon looking at them while I was mounting them, I thought they looked a little on the dark side and I was going to write about the fact that I could've overcome this by using a different exposure. On looking back to these that I have uploaded, they don't look dark. So, now I'm a little confused. Maybe next time, I could try and lighten them to compensate. I have not altered any of the settings, they are completely as I have taken them as I feel to lighten them in a programme would mean that I would be entering the manipulation bracket.
Wednesday, 19 January 2011
Initial ideas for unit 108
Digital Image Manipulation
My first initial idea for this task was going to be water. Then I moved onto flowers and water and I was having some issues getting the flowers and water together. After much consideration, I thought it would be best if I just stuck to the flowers. This will tie in well with my other tasks.
Another reason for me doing just flowers is that I can then use the water with them if I wish. I have also taken some good landscape photographs at a local beauty spot which I can also use. I have recently purchased a copy of Photoshop Elements, so now it's time to play!
Tuesday, 18 January 2011
Lenses
Prime Lens
A prime lens is a lens that has a fixed focal length. Prime lenses do not physically change at all, and the only way you can get a close up of a subject is to move closer. If you get too close, the subject features will begin to blur and distort. This means that you have to put more thought into the composition of your shot.
Prime lenses were the only lenses available at the start of photography and a 50mm f/1.8 was pretty much the slowest lens available.
An optical zoom lens is a true zoom lens. The focal length changes by shifting a zoom mechanism inside the lens itself, this allows you to magnify the scene before you take a photograph. An optical zoom lens produces higher quality images than a digital zoom.
Digital Zoom Lens
A digital zoom lens is not a genuine form of zoom but rather it is simulated that enlarges a portion of the image using the cameras own software. Obviously the closer in you zoom, the less able the software is to simulate the aoom effect and the quality of the image suffers
Standard Lens
A standard or normal lens is simply a camera lens of standard focal length (typically between 35mm and 105mm). Standard lenses have a wide range of uses and due to their simplicity are often of a very high quality and are rugged and durable.
Wide Angle Lens
A wide angle lens is used to capture an image of a large scene but are relatively useless for close up images as they will distort the subject that you are focusing on. A wide angle lens transmits a sensation of open space to your images and it typically a lens with a focal length of 50mm, although exact definitions do vary from manufacturer to manufacturer. You can also get a super-wide angle lens with a focal length of less than 24mm, which will widen the angle of the photograph further.
Telephoto Lens
Telephoto lenses bring the subject you are focusing on closer to you, and it is important to use a tripod or keep a steady hand a any shaking will be amplified. More expensive telephoto lenses have optical stabilisation systems built into the lens itself to compensate for camera shake. Due to the zoomed in nature of the final photograph, imperfections in the lens will affect the image quality far more, so you cannot get away with using bedget telephoto lenses as much as with other types.
A medium telephoto lens has a focal length of between 85mm and 135mm, while a long telephoto lens is between 135mm and 300mm, and a super telephoto lens is anything over 300mm.
A telephoto lens has long focal lengths and a narrow angle of view. They also have a shallow depth of field which means that they are great for capturing a subject and keeping the foreground and background objects out of focus. The magnification of telephoto lenses also means that it is ideal for taking photographs of subjects further away. Ideal if you cannot physically get close to your subject, i.e. taking photographs of animals in their natural habitat without disturbing them, or a sporting event where the closest you can get to is the stands, with a decent telephoto lens you can achieve close up photography at a safe distance. Some telephoto lenses can take a photo of a subject that is barely viewable by the naked eye.
Macro Lens
A macro lens is unique in that it can focus from infinity to extremely close allowing you to take pictures of very small objects and having them fill the fram and displayed in all of their glorious detail. This is not to be confused with a close-up lens which does not focus to infinity. Macro lenses can produce images at a 1:1 ratio.
Fisheye Lens
Fisheye lenses are at the fringe of wide angle lenses and offer a distorted perspective on the world. They distort the scene to offer a 180 degree image shown on a flat, two dimensional photograph. Some fisheye lenses produce and even greater field of view, as much as 220 degrees in some cases.
Tuesday, 11 January 2011
Artist Research - Robert Mapplethorpe
Robert Mapplethorpe was born on the 4th March 1946, and grew up as a Roman Catholic of English and Irish heritage in Queens, New York. He studied for a degree at the Pratt Institute in Brooklyn but dropped out in 1969 before finishing. He lived with his partner between the years of 1967-1974 and she supported him by working in bookstores. They created art together and even after they realised that he was gay, they still remained close.
In the 1970’s he acquired a Hasselblad medium format camera and he began to take photographs of his friends and acquaintances. In the 1980’s he started to photograph statuesque male and female nudes, flower still lifes especially orchids and calla lillies and portraits of artists and celebrities including Andy Warhol, Debby Harry, Richard Gere, Peter Gabriel, Grace Jones and Patti Smith. His sexually charged photographs of black men have been criticized as exploitative.


In 1986, Robert was diagnosed with AIDS. Despite his illness, he accelerated his creative efforts and accepted increasingly challenging commissions. Robert died on the morning of 9th March 1989, in Boston Massachusetts from complications arising from AIDS, he was 42. His ashes were buried in Queens in his mother’s grave marked Maxey.
I find that some of Roberts nude photographs are a little eccentric, even odd, you could probably put it down to his way of life. I love his vibrant flower photographs, the colours really stand out and even the black and white ones are fantastic. In his close up portraits, nobody appears to be smiling, most of the people look a little sad and I can't make up my mind whether I like these or not.
Artist Research - George Lepp
George Lepp is one of America’s best known contemporary outdoor and nature photographers and he is a leader in the field of digital imaging. His work is extensively published and he is the author of many books.
George has won many awards for his work and he has presented hundreds of lectures and led workshops all over the world. His images have appeared on the covers of many books and magazines, including Natural History, Car & Driver, PC Photo and Outdoor Photographer. He is also known for his panoramic images that capture magnificent locations in Africa, Antarctica, The Netherlands and North America.


One of the awards that George holds is Photo Media’s Photography Person of the Year. He also has the prestigious Progress Award, the highest given by the Photographic Society of America. George holds a Bachelor’s Degree and an Honorary Master’s Degree from the Brooks Institute of Photography.
I like how George has this interesting mix of photographs going on. There’s something for everyone and he has taken some fantastic landscape panoramic shots. I like all of his work, from the wildlife, the puppy portraits to the flowers. This is my sort of photography, just need to enough money to get to photograph the wildlife, I might have to stick to the flowers and the pups.
Artist Research - Ron van Dongen
Ron van Dongen was born in Judibana, Venezuela in 1961. He was then raised in Warmond, The Netherlands. He originally studied Biology & Health Science at the University of Delft and then went on to study photography at the Academy of Art College in San Francisco. He also studied as a floral designer and while he was at college a friend had predicted that one day he would go onto photograph flowers as a primary occupation.. This was an idea that he thought to be ridiculous as he was determined to become a portrait photographer, as he was obsessed with the human form.
He did occasionally photograph plants from time to time. It was only done so that he could practice his 4 x 5 camera skills without burdening live models. His flower pictures did attract interest but he would tell people that they were only meant as an exercise.
During the years that followed, he continued to build a portfolio of face and body photographs which had been taken in a studio with simple strobe lighting. He photographed light skin tones on black backgrounds. In another project he photographed white bodies on white backgrounds. He said that the light tones were meant to symbolize death and mourning.
He attempted to market his work to galleries and magazines and it was always his flower portfolio that was constantly singled out, so then, he reluctantly devoted his time to exclusively photograph the botanical form.


Ron van Dongen says that as long as he enjoys his gardening, he is sure that he will keep adding to his collection of plant pictures. He also felt that when the point comes that he can’t improve on his skills or can’t find any interesting plants to photograph he will start something else. But, something tells him that that is unlikely to happen in the near future. Ron van Dongen now resides in Portland, Oregon.
This is another photographer that I admire. You don’t really know who’s out there until you start looking and it is only when you find these people that you can start to appreciate their work. I think that his portraits of white on white look a little odd, I’d much rather prefer his fantastic flower photographs.
Artist Research - Art Wolfe
Art was born on 13th September 1951 in Seattle, Washington. He was the son of commercial artists. He graduated from the University of Washington with a Bachelor’s degree in fine arts and art education. Within 4 years of graduation, he had undertaken assignments for National Geographic magazine and produced his 1st photo book documenting Norwest Indian baskets.
Art has since gone on to produce more than 65 photo books and instructional videos of photographic techniques. Roughly one in ten images of Arts 1994 book Migrations was discovered to have been digitally fabricated. This included cloning to create additional animals in ensemble shots. He calls this technique ‘digital art’.
Over the course of his 30 year career, Art has worked on every continent and in 100’s of locations. His stunning images record the world’s fast diminishing wildlife, landscapes and native cultures. His photographs are recognised throughout the world for their mastery of colour, composition and perspective.

Art Wolfe


Art has taken an estimates one million images in his lifetime and has released over 60 books including the award winning Vanishing Act, The High Himalaya, Rainforests of the World to name but a few. He has won many awards including Photographic Society of America’s Progress Medal for his contribution to the advancement of the art and science of photography.
I wish that I was this man. All of the continents that he’s visited and all of the wildlife etc that he has photographed. His images portray a wealth of colour, they just bounce out of the screen at you. I spent quite a while looking at his photographs, most of his better shots could not be copied into my blog. If I could take photographs and manipulate them a small percentage as good as Art, I would be happy!
Subscribe to:
Posts (Atom)